
For effective home maintenance, caulking is a fundamental skill that every homeowner should master. Over time, gaps between two adjoining surfaces, such as a bathtub and the surrounding walls, often become vulnerable points where water can seep through, leading to mold, mildew, and even structural damage. Understanding how to properly remove old caulk and apply new caulk is essential not only for aesthetic reasons but also for protecting your home from moisture-related issues.
In this comprehensive guide, Giving Tree Home will walk you through each step of the bathtub recaulking process, whether you're replacing deteriorated caulk or addressing water leakage problems. By the end, you'll be confident in your ability to seal gaps effectively, maintaining both the functionality and beauty of your bathroom.

When to Recaulk a Bathtub
Recognizing the signs of failing caulk early can save you from costly repairs down the line. If you notice any of the following, it's a clear signal that your bathtub caulk needs attention:
Visible Cracks and Gaps
Cracks and gaps are among the first indicators that caulk is deteriorating. Over time, due to exposure to water, temperature fluctuations, and regular movement, caulk can lose its elasticity and start breaking apart. Once small gaps appear, water can easily penetrate, leading to hidden mold growth behind the tub or wall.
Further Reading: Causes of Bathroom Mold and How to Prevent It
Discoloration
If the caulk has taken on a yellowish, brownish, or even black hue, it's likely compromised. Discoloration is often a sign of prolonged exposure to moisture, cleaning chemicals, or UV light. Even if the caulk still appears intact, discolored caulk may have lost much of its waterproofing properties.
Peeling and Separation
Peeling caulk indicates a loss of adhesion between the caulk and the surfaces it is supposed to seal. You may notice strips of caulk lifting off or curling at the edges. This is not only unsightly but also a definite pathway for water to get behind the tub.
Mold and Mildew Growth

The appearance of mold or mildew, particularly black spots along the caulk line, suggests that moisture has been trapped. Since mold thrives in damp, dark areas, compromised caulking provides an ideal breeding ground. Simply cleaning the surface won't solve the root problem — replacement is necessary.
Soft or Spongy Texture
Healthy caulk should feel firm yet slightly flexible. If pressing gently on the caulk yields a soft, spongy feel, it's deteriorating from within, and the watertight seal is likely compromised.
Brittleness
Flexible caulk can accommodate slight movements of the bathtub and the building structure. When caulk becomes brittle, it loses this flexibility, resulting in cracks and separations under stress.
Separation from Surfaces
Effective caulk should firmly bond both the tub and the wall. If you notice the caulk pulling away from either surface, it's no longer providing a barrier against water infiltration.
What You Will Need
Before you start, gather the following tools and materials:
- Utility knife or caulk remover tool
- Caulk gun
- Quality caulk tube (silicone-based caulk is recommended for bathrooms)
- Painter's tape
- Rubbing alcohol
- Bleach or other disinfectant
- Wet paper towels or a damp cloth
- Non-abrasive scrubber or brush
- Disposable gloves (optional for protection)
How to Remove Old Caulk
Proper removal of the old caulk is critical to ensure a good bond for the new application.
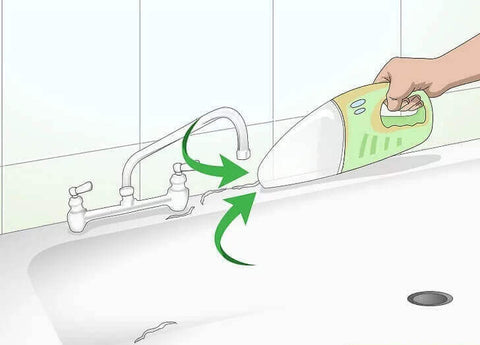
- Cut and Lift:
Using a sharp utility knife or a specialized caulk remover tool, carefully slice along the edges of the old caulk where the tub meets the wall. Insert the blade gently under the strip of caulk and peel it away in long sections. Take your time to avoid scratching the tub surface or damaging surrounding tiles.
Tip: Soften stubborn caulk by applying a caulk remover solution 15–30 minutes before cutting. This can make the process significantly easier.

- Scrape and Clean:
Once most of the caulk is removed, there will still be residual bits clinging to the surfaces. Use a non-abrasive scrubber or an old toothbrush to scrub away any remnants.
Wipe the area thoroughly with a dry cloth to remove dust and debris.
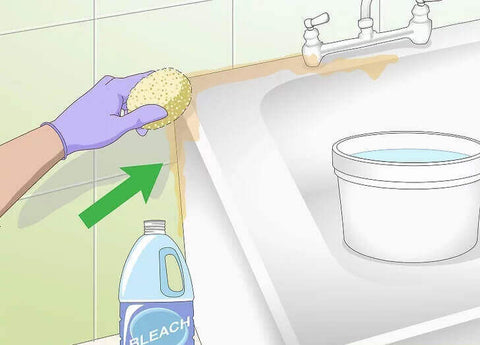
- Disinfect the Gap:
Spray bleach or a disinfectant solution along the exposed seams where the old caulk was. This step helps kill any mold spores or bacteria hiding in the cracks, preventing future growth beneath the new caulk.
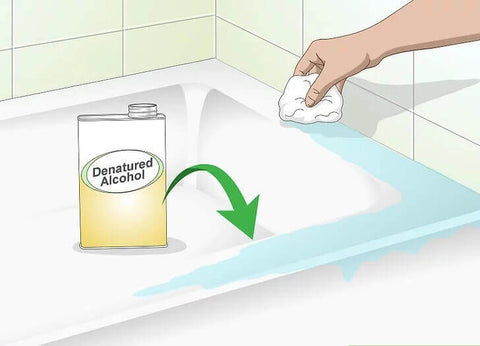
- Final Cleaning and Drying:
Wipe down the entire seam with rubbing alcohol using a clean cloth. Alcohol helps remove soap scum and oils that might interfere with adhesion.
Allow the surface to dry completely. Moisture left in the gaps can prevent the new caulk from bonding properly.
How to Apply New Caulk
Now that the area is clean and dry, you're ready to recaulk.
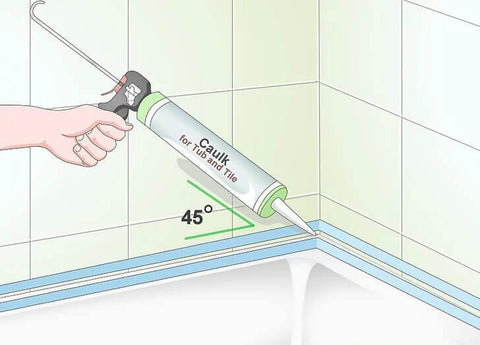
- Prepare the Area
Apply painter’s tape to both sides of the joint, leaving a narrow channel about ⅜ inch wide for the caulk bead. This creates crisp, straight edges and prevents excess caulk from spreading onto the tub or tiles.
Cut the tip of your caulk tube at a 45-degree angle to create a small opening. The hole should match the size of the gap you’re sealing — start small; you can always enlarge the cut if needed.
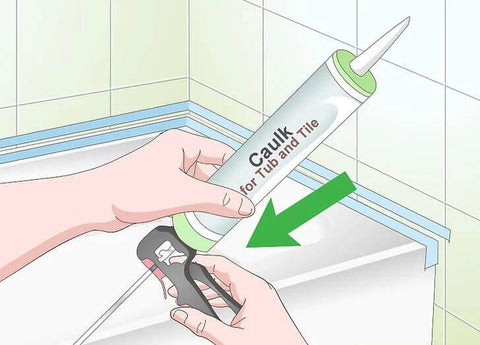
- Apply Caulk Smoothly
Load the tube into the caulk gun. Hold the gun at a consistent 45-degree angle with the nozzle pressed lightly into the gap.
Squeeze the trigger steadily while moving the gun along the seam, ensuring an even, continuous bead of caulk. Work in sections if necessary, but avoid stopping too often to keep the line consistent.
Tip: It’s better to slightly overfill the gap than to underfill it; you can smooth out any excess in the next step.
- Smooth and Press
Immediately after applying, use a damp paper towel or your finger (wearing a disposable glove) to gently press and smooth the caulk into the gap. Smoothing not only improves appearance but also ensures the caulk fully adheres to both surfaces.
Wipe away any excess caulk with a clean section of the towel for a professional finish.
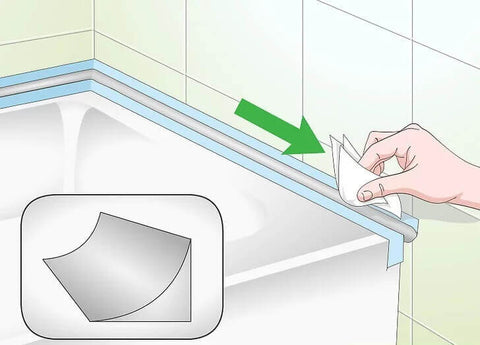
- Remove Painter’s Tape
Carefully peel off the painter's tape before the caulk begins to skin over. Pull the tape away at a 45-degree angle for the cleanest line.
- Curing Time
Allow the caulk to dry undisturbed for at least 24 hours, or as directed by the manufacturer. Avoid using the bathtub during this time to ensure a strong, watertight seal forms.
Even if the surface appears dry after a few hours, curing happens internally and requires patience for best results.
Common Mistakes to Avoid When Caulking
Even a small misstep during the process can shorten the lifespan of your caulk job. Here are frequent mistakes to avoid:
Rushing the Curing Time
Many homeowners underestimate the importance of full curing. Using the bathtub too soon can cause the fresh caulk to crack or separate, wasting all your hard work. Always check the caulk tube for specific curing guidelines.
Poor Smoothing Techniques
Attempting to smooth caulk with dry fingers can pull and drag the material, resulting in an uneven surface. Conversely, using too much water can weaken the bond. A lightly dampened paper towel or glove provides the ideal balance.
Layering New Caulk Over Old
Never apply new caulk over old, deteriorated material. It won't bond properly and will likely peel off prematurely. Proper surface preparation is key to a durable and lasting result.
Choosing the Wrong Caulk
Not all caulks are created equal. For bathrooms, always choose a high-quality, mold-resistant, waterproof silicone or hybrid formula. Acrylic caulk, though easier to work with, tends to deteriorate faster in wet environments.
Ending
Recaulking your bathtub may seem like a simple DIY task, but attention to detail makes all the difference between a patchy, short-lived fix and a professional-quality, long-lasting result. Taking the time to carefully remove old caulk, clean and disinfect surfaces, and apply new caulk correctly ensures not only a neat appearance but also robust protection against moisture and mold.
At Giving Tree Home, we believe maintaining your bathtub properly enhances your home’s comfort, beauty, and value. If you're tackling a full bathtub replacement, we recommend reading this article alongside our in-depth guide, "How to Replace a Bathtub" for a complete understanding of the process.
Stay patient, stay precise — and enjoy your refreshed, watertight bathroom for years to come.


